Thursday, October 30, 2014

Detecting and Exploiting the HTTP PUT Method

I recently found a web server which allowed the HTTP PUT Method. This was detected and proven vulnerable by a Nessus vulnerability scan which actually uploaded it's own page at /savpgr1.html with the text “A quick brown fox jumps over the lazy dog.” My first thought was to see if I could upload a shell (php, asp, jsp) which you can make in metasploit or find online. Unfortunately this didn't work as none of them were being interpreted by the server. Another possible attack scenario could have been a phishing attack where we created our own page within the web application.

During this test I didn't have much time and there wasn't a lot of information online about the HTTP PUT method from a penetration testing perspective. This blog post will be going over various ways to detect if a web server accepts the PUT method, how to successfully complete a PUT request, and how to set up a test web server which accepts PUT.

Detecting the HTTP PUT Method

  • OPTIONS method via Netcat, Burp, etc.:
    nc www.victim.com 80
    OPTIONS / HTTP/1.1
    Host: www.victim.com
    
  • Nmap: The http-methods.nse script checks each HTTP method and outputs the response. This can be really nice for quickly checking multiple servers/ports at a time. Example usage would be:
    nmap --script=http-methods.nse -p80,443 
  • Nessus: One of the ways Nessus reports on detected HTTP methods is through plugin 43111 "HTTP Methods Allowed (per directory)". The plugin file used is "web_directory_options.nasl" which can usually be found in /opt/nessus/lib/nessus/plugins.

Make a PUT Request / Upload Data

  • Request with Netcat, Burp, etc.:
    nc www.victim.com 80
    PUT /hello.htm HTTP/1.1
    User-Agent: Mozilla/4.0 (compatible; MSIE5.01; Windows NT)
    Host: www.victim.com
    Accept-Language: en-us
    Connection: Keep-Alive
    Content-type: text/html
    Content-Length: 182
    
    <html>
    <body>
    <h1>Hello, World!</h1>
    </body>
    </html>
    
  • cURL:
    curl -i -X PUT -H "Content-Type: application/xml; charset=utf-8" -d @"/tmp/some-file.xml" http://www.victim.com/newpage
    
    curl -X PUT -d "text or data to put" http://www.victim.com/destination_page
    
    curl -i -H "Accept: application/json" -X PUT -d "text or data to put" http://victim.com/new_page
    
  • Quickput.py: I found this old python script which PUTs a local file onto a target web server. The script takes two arguments: a local file and the destination url. There are optional arguments for authentication. The content-length of the local file is automatically calculated and updated in the PUT request. I had pretty good success with using this script, which can be downloaded here.
  • Nmap: The http-put.nse script uploads a local file to a web server via PUT request. I have not personally used it but it might be a good option. Example usage would be: nmap -p 80 --
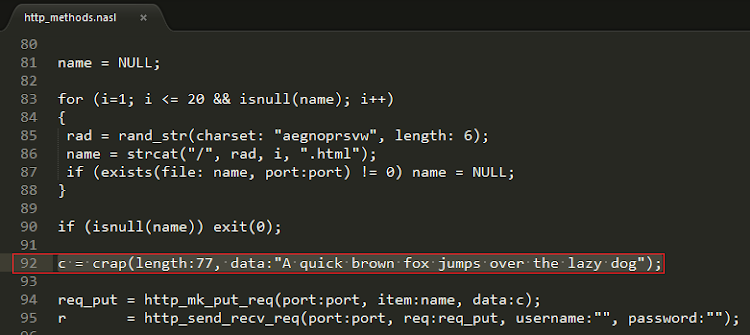
script http-put --script-args http-put.url='/uploads/rootme.php',http-put.file='/tmp/rootme.php'.
  • Nessus: Nessus has an interesting plugin which actually makes the PUT request with its own data. This is done by plugin 10498 "Web Server HTTP Dangerous Method Detection." I have not tried this but am fairly certain it would work: edit the "http_methods.nasl" with your own data and run the Nessus scan with that plugin enabled. Just a quick update to the data and content length should be it.
  • Metasploit: Metasploit also gives you the ability to PUT a file with auxiliary/scanner/http/http_put. I haven't tried this but it seems straight forward.

Example PUT Python Web Server

To test some of the techniques discussed I originally tried to configure an Apache server but had issues getting it to successfully accept my PUT requests, so I found and modified a couple of python scripts to set up a quick web server for testing. Here it is working with the Quickput.py script I mentioned earlier:
The python PUT server script can be downloaded here but it may be sensitive to how the requests are formatted and not accept requests using the methods mentioned above.

Hopefully this is enough to get started with making PUT requests. It's a really interesting attack vector and should not be allowed by application developers and owners in most circumstances. If you you have any other ideas or suggestions based on this post please comment!

Resources:

https://www.owasp.org/index.php/Testing_for_HTTP_Methods_and_XST
http://www.tutorialspoint.com/http/http_methods.htm
https://gist.githubusercontent.com/codification/1393204/raw/3fd4a4...429f/server.py
http://www.acmesystems.it/python_httpserver

Tuesday, June 3, 2014

HTTP Security Headers Nmap Parser

Click here to download source code

Recently there have been some reports on how often major sites such as the Alexa top sites use security-related HTTP headers. Surprisingly (or maybe not) most are NOT taking full advantage of these headers. Among many system owners there seems to be a lack of awareness in regards to http headers, especially those related to security. In many architectures, these headers can be configured without changing the application, so why not take a look at them for your own sites? The reward for implementing (or removing) some of these headers can be extremely beneficial. It is worth noting that some headers are only supported by specific browsers and only offer a certain level of protection, so these headers should not be solely relied on from a security perspective.

What’s one of the first things we do when we start testing the security posture of a network? Discovery with Nmap. Nmap has a built in NSE script ‘http-headers’ which will return the headers via a HEAD request of a web server. Manually looking through a large Nmap output file to see which headers are being used can be really difficult, so I wrote a small parser in python which takes in the Nmap .xml output file and generates an .html report with only security-related header information.

Steps:

  1. Run Nmap with http-headers script and xml output:
    nmap --script=http-headers <target> -oX output_file.xml
  2. Run Security-Headers-Nmap-Parser.py with the .xml Nmap output file:
    python Security-Headers-Nmap-Parser.py -f output_file.xml

Usage: Security-Headers-Nmap-Parser.py { -f file } [-o output_filename]
There is one required argument which is the .xml Nmap output file. The user can also specify the output filename (default: Security-Headers-Report.html)

After running the script we have a nicely formatted table which contains every asset (ip:port) from the Nmap scan. Each asset displays information about nine different security-related headers: Access Control Allow Origin, Content Security Policy, Server, Strict Transport Security, Content Type Options, Frame Options, Cross Domain Policies, Powered By, and XSS Protection. This table can be copied into software such as Microsoft Excel and modified or sorted as necessary.

The reason behind creating this table is to get a clear view of the headers used in a large environment. With this report we can search for individual IPs and report on them or get a general feeling for the security posture of many servers.

Resources:
https://securityheaders.com
https://www.owasp.org

Wednesday, November 6, 2013

HashTag: Password Hash Identification

Interested in password cracking or cryptography? Check this out. HashTag.py is a tool written in python which parses and identifies various password hashes based on their type. HashTag was inspired by attending PasswordsCon 13 in Las Vegas, KoreLogic's 'Crack Me If You Can' competition at Defcon, and the research of iphelix and his toolkit PACK (password analysis and cracking kit). HashTag supports the identification of over 250 hash types along with matching them to over 110 hashcat modes. HashTag is able to identify a single hash, parse a single file and identify the hashes within it, or traverse a root directory and all subdirectories for potential hash files and identify any hashes found.

Click here to download source code or access it online at OnlineHashCrack


One of the biggest aspects of this tool is the identification of password hashes. The main attributes I used to distinguish between hash types are character set (hexadecimal, alphanumeric, etc.), hash length, hash format (e.g. 32 character hash followed by a colon and a salt), and any specific substrings (e.g. '$1$'). A lot of password hash strings can't be identified as one specific hash type based on these attributes. For example, MD5 and NTLM hashes are both 32 character hexadecimal strings. In these cases I make an exhaustive list of possible types and have the tool output reflect that. During development I created an excel spreadsheet which contains much of the hash information which can be found here or here.

Usage:

HashTag.py {-sh hash |-f file |-d directory} [-o output_filename] [-hc] [-n]

Note: When identifying a single hash on *nix operating systems, remember to use single quotes to prevent interpolation. (e.g. python HashTag.py -sh '$1$abc$12345')

-h, --help show this help message and exit
-sh SINGLEHASH, --singleHash SINGLEHASH Identify a single hash
-f FILE, --file FILE Parse a single file for hashes and identify them
-d DIRECTORY, --directory DIRECTORY Parse, identify, and categorize hashes within a directory and all subdirectories
-o OUTPUT, --output OUTPUT Filename to output full list of all identified hashes
--file default filename: HashTag/HashTag_Output_File.txt
--directory default filename: HashTag/HashTag_Hash_File.txt
-hc, --hashcatOutput --file: Output a file per different hash type found, if corresponding hashcat mode exists
--directory: Appends hashcat mode to end of separate files
-n, --notFound --file: Include unidentifiable hashes in the output file. Good for tool debugging (Is it Identifying properly?)

Identify a single hash (-sh):

HashTag.py -sh $1$MtCReiOj$zvOdxVzPtrQ.PXNW3hTHI0
single hash example

HashTag.py -sh 7026360f1826f8bc

single hash example 2

HashTag.py -sh 3b1015ccf38fc2a32c18674c166fa447

single hash example 3

Parsing and identifying hashes from a file (-f):

HashTag.py -f testdir\street-hashes.10.txt -hc
hashes file example
Here is the output file. Each identified hash outputs the hash, char length, hashcat modes (if found) , and possible hash types:
Output file
Using the -hc/--hashcat argument we get a file for each hash type if a corresponding hashcat mode is found. This makes the process of cracking hashes with hashcat much easier as you immediately have the mode and input file of hashes:
file listing output
Output from a file with many different hash types (the filenames are hashcat modes and inside are all hashes of that type):
hashtag output directory with multiple files

Traversing Directories and Identifying Hashes (-d):

HashTag.py -d ./testdir -hc
directory example

The output consists of three main things:

  • Folders containing copies of potentially password protected files. This makes it easy to group files based on extension and attempt to crack them.
  • HashTag default files - A listing of all hashes, password protected files the tool doesn't recognize, and hashes the tool can't identify (good for tool debugging).
  • Files for each identified hash type - each file contains a list of hashes. The -hc/--hashcat argument will append the hashcat mode (if found) to the filename.
hashtag output directory

Resources: Quite a bit of research went into the difference between password hash types. During this research I found a script called Hash Identifier which was actually included in one of the Backtrack versions. After looking it over I feel my tool has a lot more functionality, efficiency, and accuracy. My other research ranged from finding different hash examples to generating my own hashes via the passlib module. I would like to give credit to the following resources which all had some impact in the creation of this tool.

http://wiki.insidepro.com/index.php/Main_Page
https://hashcat.net/wiki/
http://openwall.info/wiki/john/
http://pythonhosted.org/passlib/index.html

As always, if you see any coding errors, false assumptions (hash identification), or have constructive criticism please contact me. Hope you like it!

Saturday, August 3, 2013

Defcon 21: Password Cracking KoreLogic's Shirt

For the past couple of years KoreLogic Security has had a wonderful presence at Defcon with their 'Crack Me If You Can' contest where some of the best password crackers in the world join up in teams or go solo to compete against each other. Although I haven't competed in this competition (mainly due to lack of hardware and wanting to spend most of my time at briefings) I always make it a point to stop by the KoreLogic booth and grab a shirt. No, I'm not doing it because it's 'free swag', I always stop by for great conversation and to get one of their shirts which have relatively simple hash(es) on them. It's rather fun to practice even the simple things with password cracking. This year for Defcon 21 the shirt they gave out looked like this:

Clearly there is a hash in there somewhere.. looking a little closer it's clear there is a 32 character pattern which wraps around the logo. Hmm.. the most common 32 character hash.. md5! Let's give it a try.

Wait.. how do we know where the hash starts and ends? We don't. There are 32 characters which means 32 different possibilities for the correct hash. To generate the different permutations I wrote a quick python script which writes all of the possible hashes to the file hashlist.hash.

#!/usr/bin/python 

hashArray = ['b','2','c','b','b','e','c','9','1','6','d','c','8','2','b','2','f','b','2','0','d','1','2','b','e','1','d','7','e','3','d','b'] 
hashList = list() 
fullHash = '' 

charIndex = 0 
while charIndex < len(hashArray): 
 hashArray = hashArray[charIndex:] + hashArray[:charIndex] 
 for i in range(len(hashArray)): 
  fullHash += hashArray[i] 
 hashList.append(fullHash) 
 fullHash = '' 
 charIndex += 1 

f = open('hashlist.hash', 'w') 
for item in hashList: 
 f.write(item + '\n') 
 print item
We now have the following possibilities:
b2cbbec916dc82b2fb20d12be1d7e3db 
2cbbec916dc82b2fb20d12be1d7e3dbb 
bbec916dc82b2fb20d12be1d7e3dbb2c 
c916dc82b2fb20d12be1d7e3dbb2cbbe 
dc82b2fb20d12be1d7e3dbb2cbbec916 
2fb20d12be1d7e3dbb2cbbec916dc82b 
12be1d7e3dbb2cbbec916dc82b2fb20d 
e3dbb2cbbec916dc82b2fb20d12be1d7 
bec916dc82b2fb20d12be1d7e3dbb2cb 
2b2fb20d12be1d7e3dbb2cbbec916dc8 
be1d7e3dbb2cbbec916dc82b2fb20d12 
cbbec916dc82b2fb20d12be1d7e3dbb2 
b2fb20d12be1d7e3dbb2cbbec916dc82 
7e3dbb2cbbec916dc82b2fb20d12be1d 
6dc82b2fb20d12be1d7e3dbb2cbbec91 
e1d7e3dbb2cbbec916dc82b2fb20d12b 
16dc82b2fb20d12be1d7e3dbb2cbbec9 
1d7e3dbb2cbbec916dc82b2fb20d12be 
c82b2fb20d12be1d7e3dbb2cbbec916d 
dbb2cbbec916dc82b2fb20d12be1d7e3 
20d12be1d7e3dbb2cbbec916dc82b2fb 
916dc82b2fb20d12be1d7e3dbb2cbbec 
3dbb2cbbec916dc82b2fb20d12be1d7e 
d12be1d7e3dbb2cbbec916dc82b2fb20 
82b2fb20d12be1d7e3dbb2cbbec916dc 
ec916dc82b2fb20d12be1d7e3dbb2cbb 
bb2cbbec916dc82b2fb20d12be1d7e3d 
d7e3dbb2cbbec916dc82b2fb20d12be1 
2be1d7e3dbb2cbbec916dc82b2fb20d1 
0d12be1d7e3dbb2cbbec916dc82b2fb2 
b20d12be1d7e3dbb2cbbec916dc82b2f 
fb20d12be1d7e3dbb2cbbec916dc82b2 

Since I am using a netbook instead of a crazy GPU rig I decided to use hashcat which does CPU cracking (plus and lite for GPU). I then downloaded the rockyou.txt wordlist from skullsecurity. Everything is now ready, I have my cracking tool, list of hashes, and wordlist. Since I am assuming it's md5 I use the following hashcat command:

./hashcat-cli32.bin -m 0 -r rules/best64.rule hashlist.hash rockyou.txt

After about 30 seconds of running we get a hit!

3dbb2cbbec916dc82b2fb20d12be1d7e:DEFCON

A little anticlimactic but fun nonetheless. This was rather simple, some would say trivial, but the script to make multiple hash permutations with only characters may be helpful to someone. Big thanks to KoreLogic for putting on the CMIYC contest and giving out shirts with challenges.