Showing posts with label Tools. Show all posts

Thursday, March 23, 2017

SmeegeScrape: Text Scraper and Custom Word List Generator

Click Here to Download Source Code

Customize your security testing with SmeegeScrape.py! It's a simple python script to scrape text from various sources including local files and web pages, and turn the text into a custom word list. A customized word list has many uses, from web application testing to password cracking, having a specific set of words to use against a target can increase efficiency and effectiveness during a penetration test. I realize there are other text scrapers publicly available however I feel this script is simple, efficient, and specific enough to warrant its own release. This script is able to read almost any file which has cleartext in it that python can open. I have also included support for file formats such as pdf, html, docx, and pptx.

usage

Usage:

SmeegeScrape.py {-f file | -d directory | -u web_url | -l url_list_file} [-o output_filename] [-s] [-i] [-min #] [-max #]

One of the following input types is required:(-f filename), (-d directory), (-u web_url), (-l url_list_file)

-h, --help show this help message and exit
-f LOCALFILE, --localFile LOCALFILE Specify a local file to scrape
-d DIRECTORY, --fileDirectory DIRECTORY Specify a directory to scrape the inside files
-u URL, --webUrl URL Specify a url to scrape page content (correct format: http(s)://smeegesec.com)
-l URL_LIST_FILE, --webList URL_LIST_FILE Specify a text file with a list of URLs to scrape (separated by newline)
-o FILENAME, --outputFile FILENAME Specify output filename (default: smeegescrape_out.txt)
-i, --integers Remove integers [0-9] from all output
-s, --specials Remove special characters from all output
-min # Specify the minimum length for all words in output
-max # Specify the maximum length for all words in output

Scraping a local file:

SmeegeScrape.py -f Test-File.txt
This is a sample text file with different text.
This file could be different filetypes including html, pdf, powerpoint, docx, etc.  
Anything which can be read in as cleartext can be scraped.
I hope you enjoy SmeegeScrape, feel free to comment if you like it!

enjoy
comment
powerpoint,
feel
text
is
sample
as
including
file
in
if
different
pdf,
to
read
which
you
SmeegeScrape,
hope
be
Anything
This
html,
cleartext
text.
free
it!
with
a
I
like
filetypes
could
scraped.
can
many
docx,
etc.

Each word is separated by a newline. The options -i and -s can be used to remove any integers or special characters found. Also, the -min and -max arguments can be used to specify desired word length.

Scraping a web page:

SmeegeScrape.py -u http://www.smeegesec.com -si

To scrape web pages we use the python urllib2 module. The format of the url is checked via regex and it must be in the correct format (e.g. http(s)://smeegesec.com)

web scrape output

Scraping multiple files from a directory:

SmeegeScrape.py -d test\ -si -min 5 -max 12

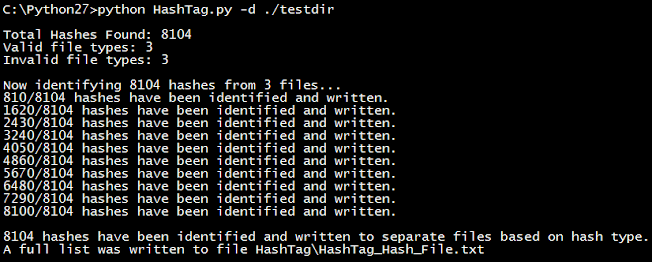
The screen output shows each file which was scraped, the total number of unique words found based on the user's desired options, and the output filename.

directory scrape output

Scraping multiple URLs:

SmeegeScrape.py -l weblist.txt -si -min 6 -max 10

The -l option takes in a list of web urls from a text file and scrapes each url. Each scraped URL is displayed on the screen as well as a total number of words scraped.

url list scraping url list scraping 2

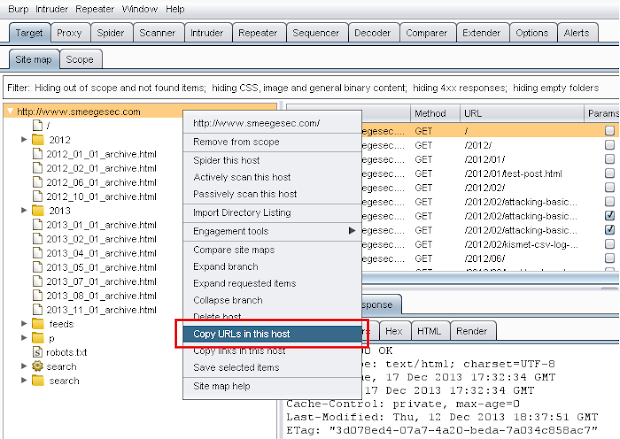
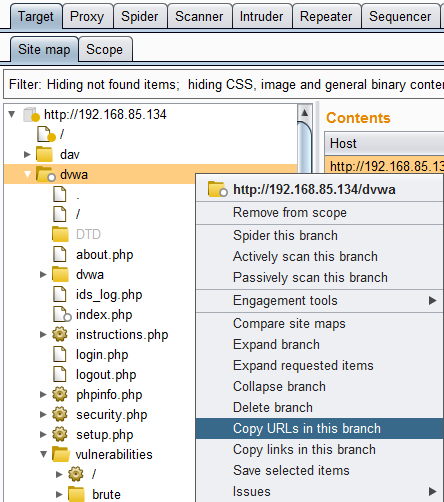
This weblist option is excellent to use with Burp Suite to scrape an entire site. To do this, proxy your web traffic through Burp and discover as much content on the target site as you can (spidering, manual discovery, dictionary attack on directories/files, etc.). After the discovery phase, right click on the target in the site map and select the option "Copy URLs in this host" from the drop down list. In this instance for even a small blog like mine over 300 URLs were copied. Depending on the size of the site the scraping could take a little while, be patient!

burp copy URLs in host

Now just paste the URLs into a text file and run that as input with the -l option.

SmeegeScrape.py -l SmeegeScrape-Burp-URLs.txt -si -min 6 -max 12
final output after parsing

So very easily we just scraped an entire site for words with specific attributes (length and character set) that we want.

As you can see there are many different possibilities with this script. I tried to make it as accurate as possible however sometimes the script depends on modules such as nltk, docx, etc. which may not always work correctly. In situations like this where the script is unable to read a certain file format, I would suggest trying to convert it to a more readable file type or copy/paste the text to a text file which can always be scraped.

The custom word list dictionaries you create are up to your imagination so have fun with it! This script could also be easily modified to extract phrases or sentences which could be used with password cracking passphrases. Here are a couple examples I made:

Holy Bible King James Version of 1611:
SmeegeScrape.py -f HolyBibleDocx.docx -si -min 6 -max 12 -o HolyBible_scraped.txt
Testament
Esther
Obadiah
parents
strife
fearful
passage
deathmark
continuance
children
nought
remove
traffic
Malachi
Haggai

Shakespeare's Romeo and Juliet:
SmeegeScrape.py -u http://shakespeare.mit.edu/romeo_juliet/full.html -si -min 6 -max 12 -o romeo_juliet_scraped.txt
Juliet
Entire
Shakespeare
heartless
Benvolio
manage
coward
several
houses
Citizen
partisans
Capulets
CAPULET
crutch
households

Feel free to share your scraped lists or ideas on useful content to scrape. Comments and suggestions welcome, enjoy!

Tuesday, February 2, 2016

Burp Suite Extension: Burp Importer

Burp Importer is a Burp Suite extension written in python which allows users to connect to a list of web servers and populate the sitemap with successful connections. Burp Importer also has the ability to parse Nessus (.nessus), Nmap (.gnmap), or a text file for potential web connections. Have you ever wished you could use Burp’s Intruder to hit multiple targets at once for discovery purposes? Now you can with the Burp Import extension. Use cases for this extension consist of web server discovery, authorization testing, and more!

Click here to download source code

Installing

  1. Download Jython standalone Jar: http://www.jython.org/downloads.html
  2. In the Extender>Options tab point your Python Environment to the Jython file.
  3. Add Burp Importer in the Extender>Extensions tab.

General Use

Burp Importer is easy to use as it’s fairly similar to Burp’s Intruder tool. The first section of the extension is the file load option which is optional and used to parse Nessus (.nessus), Nmap (.gnmap), or a list of newline separated URLs (.txt). Nessus files are parsed for the HTTP Information Plugin (ID 24260). Nmap files are parsed for open common web ports from a predefined dictionary. Text files should be a list of URLs which conform to the java.net.URL format and separated by a newline. After the files are parsed a list of generated URLs will be added to the URL List box.


The URL List section is almost identical to Burp Intruder’s Payload Options. Users have the ability to paste a list of URLs, copy the current list, remove a URL from the list, clear the entire list, or add an individual URL. A connection to each item in the list will be attempted using the java.net.URL class and Burp makeHttpRequest method.

Gnamp file parsed example:


Nessus file parsed example:


The last section of the extension provides the user a checkbox option to follow redirects, run the list of URLs, and a run log. Redirects are determined by 301 and 302 status codes and based on the ‘Location’ header in the response. The run log displays the same output which shows in the Extender>Extensions>Output tab. It shows basic data any time you run the URL list such as successful connections, number of redirects (if enabled), and a list of URLs which are malformed or have connectivity issues.

Running a list of hosts:


Items imported into the sitemap:


Use Case – Discovery

One of the main motivations for creating this extension was to help the discovery phase of an application or network penetration test. Parsing through network or vulnerability scan results can be tedious and inefficient which is why automation is a vital part of penetration testing. This extension can be utilized as just a file parser which generates valid URLs to use with other tools and can also be used to gain quick insight into the web application scope of a network. There are many ways to utilize this tool from a discovery perspective, which include:

  • Determine the web scope of an environment via successful connections added to the sitemap.
  • Search or scrape for certain information from multiple sites. An example of this would be searching multiple sites for e-mail addresses or other specific information.
  • Determine the low-level vulnerability posture of multiple sites or pages via spidering then passive or active scanning.

Use Case – Authorization Testing

Another way to use this extension is to check an application for insecure direct object references. This refers to restricting objects or pages only to users who are authorized. To do this requires at least one set of valid credentials or potentially more depending on how many user roles are being tested. Also, session handling rules must be set to use cookies from Burp’s cookie jar with Extender.

The following steps can then be performed:

  1. Authenticate with the highest privileged account and spider/discover as many objects and pages as possible. Don’t forget to use intruder to search for hidden directories as well as convert POST requests to GET which can also be used to access additional resources (if allowed by the server of course).
  2. In the sitemap right click on the host at the correct path and select ‘Copy URLs in this branch.’ This will give you a list of resources which were accessed by the high privileged account.
  3. Logout and clear any saved session information.
  4. Login with a lower privileged user which could also be a user with no credentials or user role at all. Be sure you have an active session with this user.
  5. Open the Burp Importer tab and paste the list of resources retrieved from the higher privileged account into the URL List box. Select the ‘Enable: Follow Redirects’ box as it helps you know if you are being redirected to a login or error page.
  6. Analyze the results! A list of ‘failed’ connections and the number of redirects will automatically be added to the Log box. These are a good indicator if the lower privileged session was able to access the resources or if they were just redirected to a login/error page. The sitemap should also be searched to manually verify if any unauthorized resources were indeed successfully accessed. Entire branches of responses can be searched using regex and a negative match for the ‘Location’ header to find valid connections.
Here we can see the requests made to the DVWA application while logged in as 'admin' were not able to connect and redirected to the login page after the original administrative session was logged out of and killed. During this use case the DVWA application was not vulnerable to insecure direct object references.

There are many other uses for this extension just use your imagination! If you come up with any cool ideas or have any comments please reach out to me.

Tuesday, June 3, 2014

HTTP Security Headers Nmap Parser

Click here to download source code

Recently there have been some reports on how often major sites such as the Alexa top sites use security-related HTTP headers. Surprisingly (or maybe not) most are NOT taking full advantage of these headers. Among many system owners there seems to be a lack of awareness in regards to http headers, especially those related to security. In many architectures, these headers can be configured without changing the application, so why not take a look at them for your own sites? The reward for implementing (or removing) some of these headers can be extremely beneficial. It is worth noting that some headers are only supported by specific browsers and only offer a certain level of protection, so these headers should not be solely relied on from a security perspective.

What’s one of the first things we do when we start testing the security posture of a network? Discovery with Nmap. Nmap has a built in NSE script ‘http-headers’ which will return the headers via a HEAD request of a web server. Manually looking through a large Nmap output file to see which headers are being used can be really difficult, so I wrote a small parser in python which takes in the Nmap .xml output file and generates an .html report with only security-related header information.

Steps:

  1. Run Nmap with http-headers script and xml output:
    nmap --script=http-headers <target> -oX output_file.xml
  2. Run Security-Headers-Nmap-Parser.py with the .xml Nmap output file:
    python Security-Headers-Nmap-Parser.py -f output_file.xml

Usage: Security-Headers-Nmap-Parser.py { -f file } [-o output_filename]
There is one required argument which is the .xml Nmap output file. The user can also specify the output filename (default: Security-Headers-Report.html)

After running the script we have a nicely formatted table which contains every asset (ip:port) from the Nmap scan. Each asset displays information about nine different security-related headers: Access Control Allow Origin, Content Security Policy, Server, Strict Transport Security, Content Type Options, Frame Options, Cross Domain Policies, Powered By, and XSS Protection. This table can be copied into software such as Microsoft Excel and modified or sorted as necessary.

The reason behind creating this table is to get a clear view of the headers used in a large environment. With this report we can search for individual IPs and report on them or get a general feeling for the security posture of many servers.

Resources:
https://securityheaders.com
https://www.owasp.org

Wednesday, November 6, 2013

HashTag: Password Hash Identification

Interested in password cracking or cryptography? Check this out. HashTag.py is a tool written in python which parses and identifies various password hashes based on their type. HashTag was inspired by attending PasswordsCon 13 in Las Vegas, KoreLogic's 'Crack Me If You Can' competition at Defcon, and the research of iphelix and his toolkit PACK (password analysis and cracking kit). HashTag supports the identification of over 250 hash types along with matching them to over 110 hashcat modes. HashTag is able to identify a single hash, parse a single file and identify the hashes within it, or traverse a root directory and all subdirectories for potential hash files and identify any hashes found.

Click here to download source code or access it online at OnlineHashCrack


One of the biggest aspects of this tool is the identification of password hashes. The main attributes I used to distinguish between hash types are character set (hexadecimal, alphanumeric, etc.), hash length, hash format (e.g. 32 character hash followed by a colon and a salt), and any specific substrings (e.g. '$1$'). A lot of password hash strings can't be identified as one specific hash type based on these attributes. For example, MD5 and NTLM hashes are both 32 character hexadecimal strings. In these cases I make an exhaustive list of possible types and have the tool output reflect that. During development I created an excel spreadsheet which contains much of the hash information which can be found here or here.

Usage:

HashTag.py {-sh hash |-f file |-d directory} [-o output_filename] [-hc] [-n]

Note: When identifying a single hash on *nix operating systems, remember to use single quotes to prevent interpolation. (e.g. python HashTag.py -sh '$1$abc$12345')

-h, --help show this help message and exit
-sh SINGLEHASH, --singleHash SINGLEHASH Identify a single hash
-f FILE, --file FILE Parse a single file for hashes and identify them
-d DIRECTORY, --directory DIRECTORY Parse, identify, and categorize hashes within a directory and all subdirectories
-o OUTPUT, --output OUTPUT Filename to output full list of all identified hashes
--file default filename: HashTag/HashTag_Output_File.txt
--directory default filename: HashTag/HashTag_Hash_File.txt
-hc, --hashcatOutput --file: Output a file per different hash type found, if corresponding hashcat mode exists
--directory: Appends hashcat mode to end of separate files
-n, --notFound --file: Include unidentifiable hashes in the output file. Good for tool debugging (Is it Identifying properly?)

Identify a single hash (-sh):

HashTag.py -sh $1$MtCReiOj$zvOdxVzPtrQ.PXNW3hTHI0
single hash example

HashTag.py -sh 7026360f1826f8bc

single hash example 2

HashTag.py -sh 3b1015ccf38fc2a32c18674c166fa447

single hash example 3

Parsing and identifying hashes from a file (-f):

HashTag.py -f testdir\street-hashes.10.txt -hc
hashes file example
Here is the output file. Each identified hash outputs the hash, char length, hashcat modes (if found) , and possible hash types:
Output file
Using the -hc/--hashcat argument we get a file for each hash type if a corresponding hashcat mode is found. This makes the process of cracking hashes with hashcat much easier as you immediately have the mode and input file of hashes:
file listing output
Output from a file with many different hash types (the filenames are hashcat modes and inside are all hashes of that type):
hashtag output directory with multiple files

Traversing Directories and Identifying Hashes (-d):

HashTag.py -d ./testdir -hc
directory example

The output consists of three main things:

  • Folders containing copies of potentially password protected files. This makes it easy to group files based on extension and attempt to crack them.
  • HashTag default files - A listing of all hashes, password protected files the tool doesn't recognize, and hashes the tool can't identify (good for tool debugging).
  • Files for each identified hash type - each file contains a list of hashes. The -hc/--hashcat argument will append the hashcat mode (if found) to the filename.
hashtag output directory

Resources: Quite a bit of research went into the difference between password hash types. During this research I found a script called Hash Identifier which was actually included in one of the Backtrack versions. After looking it over I feel my tool has a lot more functionality, efficiency, and accuracy. My other research ranged from finding different hash examples to generating my own hashes via the passlib module. I would like to give credit to the following resources which all had some impact in the creation of this tool.

http://wiki.insidepro.com/index.php/Main_Page
https://hashcat.net/wiki/
http://openwall.info/wiki/john/
http://pythonhosted.org/passlib/index.html

As always, if you see any coding errors, false assumptions (hash identification), or have constructive criticism please contact me. Hope you like it!

Saturday, August 3, 2013

Defcon 21: Password Cracking KoreLogic's Shirt

For the past couple of years KoreLogic Security has had a wonderful presence at Defcon with their 'Crack Me If You Can' contest where some of the best password crackers in the world join up in teams or go solo to compete against each other. Although I haven't competed in this competition (mainly due to lack of hardware and wanting to spend most of my time at briefings) I always make it a point to stop by the KoreLogic booth and grab a shirt. No, I'm not doing it because it's 'free swag', I always stop by for great conversation and to get one of their shirts which have relatively simple hash(es) on them. It's rather fun to practice even the simple things with password cracking. This year for Defcon 21 the shirt they gave out looked like this:

Clearly there is a hash in there somewhere.. looking a little closer it's clear there is a 32 character pattern which wraps around the logo. Hmm.. the most common 32 character hash.. md5! Let's give it a try.

Wait.. how do we know where the hash starts and ends? We don't. There are 32 characters which means 32 different possibilities for the correct hash. To generate the different permutations I wrote a quick python script which writes all of the possible hashes to the file hashlist.hash.

#!/usr/bin/python 

hashArray = ['b','2','c','b','b','e','c','9','1','6','d','c','8','2','b','2','f','b','2','0','d','1','2','b','e','1','d','7','e','3','d','b'] 
hashList = list() 
fullHash = '' 

charIndex = 0 
while charIndex < len(hashArray): 
 hashArray = hashArray[charIndex:] + hashArray[:charIndex] 
 for i in range(len(hashArray)): 
  fullHash += hashArray[i] 
 hashList.append(fullHash) 
 fullHash = '' 
 charIndex += 1 

f = open('hashlist.hash', 'w') 
for item in hashList: 
 f.write(item + '\n') 
 print item
We now have the following possibilities:
b2cbbec916dc82b2fb20d12be1d7e3db 
2cbbec916dc82b2fb20d12be1d7e3dbb 
bbec916dc82b2fb20d12be1d7e3dbb2c 
c916dc82b2fb20d12be1d7e3dbb2cbbe 
dc82b2fb20d12be1d7e3dbb2cbbec916 
2fb20d12be1d7e3dbb2cbbec916dc82b 
12be1d7e3dbb2cbbec916dc82b2fb20d 
e3dbb2cbbec916dc82b2fb20d12be1d7 
bec916dc82b2fb20d12be1d7e3dbb2cb 
2b2fb20d12be1d7e3dbb2cbbec916dc8 
be1d7e3dbb2cbbec916dc82b2fb20d12 
cbbec916dc82b2fb20d12be1d7e3dbb2 
b2fb20d12be1d7e3dbb2cbbec916dc82 
7e3dbb2cbbec916dc82b2fb20d12be1d 
6dc82b2fb20d12be1d7e3dbb2cbbec91 
e1d7e3dbb2cbbec916dc82b2fb20d12b 
16dc82b2fb20d12be1d7e3dbb2cbbec9 
1d7e3dbb2cbbec916dc82b2fb20d12be 
c82b2fb20d12be1d7e3dbb2cbbec916d 
dbb2cbbec916dc82b2fb20d12be1d7e3 
20d12be1d7e3dbb2cbbec916dc82b2fb 
916dc82b2fb20d12be1d7e3dbb2cbbec 
3dbb2cbbec916dc82b2fb20d12be1d7e 
d12be1d7e3dbb2cbbec916dc82b2fb20 
82b2fb20d12be1d7e3dbb2cbbec916dc 
ec916dc82b2fb20d12be1d7e3dbb2cbb 
bb2cbbec916dc82b2fb20d12be1d7e3d 
d7e3dbb2cbbec916dc82b2fb20d12be1 
2be1d7e3dbb2cbbec916dc82b2fb20d1 
0d12be1d7e3dbb2cbbec916dc82b2fb2 
b20d12be1d7e3dbb2cbbec916dc82b2f 
fb20d12be1d7e3dbb2cbbec916dc82b2 

Since I am using a netbook instead of a crazy GPU rig I decided to use hashcat which does CPU cracking (plus and lite for GPU). I then downloaded the rockyou.txt wordlist from skullsecurity. Everything is now ready, I have my cracking tool, list of hashes, and wordlist. Since I am assuming it's md5 I use the following hashcat command:

./hashcat-cli32.bin -m 0 -r rules/best64.rule hashlist.hash rockyou.txt

After about 30 seconds of running we get a hit!

3dbb2cbbec916dc82b2fb20d12be1d7e:DEFCON

A little anticlimactic but fun nonetheless. This was rather simple, some would say trivial, but the script to make multiple hash permutations with only characters may be helpful to someone. Big thanks to KoreLogic for putting on the CMIYC contest and giving out shirts with challenges.

Tuesday, July 2, 2013

Burp Extension: Directory and File Listing Parser - Burp Site Map Importer

Click Here to Download Source Code

Penetration testers, rejoice! While conducting application penetration tests it’s sometimes necessary to request specific information from the application owner or client. As a pen tester it can be extremely beneficial to perform a test with a full directory and file listing of the application, which sometimes can be difficult to acquire.

So let’s assume all clients are perfect and provide a full directory and file listing of their application (funny, I know) but what do we do with it? My process usually involves manually looking over everything trying to find keywords which jump out… I just might want to take a look at adminpassword.txt. Depending on the size of the application I may attempt to reach every file but usually this is not an efficient use of time. I wanted to create a quick and easy process for dealing with directory and file listings so I created a Burp Suite extension which will do a lot of the work for me.

My Burp extension contains two main features. The first feature is the ability to parse the listing file and generate a list of valid URLs to request each resource. The second feature is generating a request for each URL and importing the valid request/response pairs into Burp’s Target Site Map. Why is having a full site map helpful? We now have the ability to see the entire structure of the application, search within all valid responses, conduct manual testing or an active scan on ALL accessible resources, and much more. The process flow looks like this:

The Burp extension is written in python so a standalone jython jar will be needed to run it: Currently the extension is only tested and working with jython-standalone 2.5.3


After loading the extension you will have an option in the context menu to “Import Directory Listing”:

A GUI will appear for the extension. Fields such as hostname, SSL, and port will automatically populate depending on the request or response the menu option was originally invoked from. Cookies will also be displayed and used in any requests the extension makes. This feature makes it easy to compare site maps of two application user roles (based on varying session information such as cookies) to determine if each role has the correct access.

In this example I have selected the “Import Directory Listing” menu option on the DVWA web application which is running on my local machine. Now we must fill out all options on the left side of the GUI including hostname, full directory path (windows only, but CAN be used to modify URLs from a linux listing type) which specifies where the root of the web application sits, SSL, port, file listing type, and path to listing file.

On a Windows XP machine, I used the ‘dir /s’ command in cmd.exe which displays all files from the current directory and all sub directories. If the application is sitting on a Windows platform this is a very common command used for directory and file listings. A partial output of a directory and file listing for the DVWA web application (selected in the above image as C:\dvwa-listing.txt) looks like this:

dir /s:
 Volume in drive C has no label.
 Volume Serial Number is 5033-AA99

 Directory of C:\xampp\htdocs\dvwa

09/08/2010  09:50 PM    <DIR>          .
09/08/2010  09:50 PM    <DIR>          ..
09/08/2010  09:49 PM               497 .htaccess
08/26/2010  11:15 AM             2,792 about.php
06/06/2010  07:55 PM             5,066 CHANGELOG.txt
09/08/2010  09:50 PM    <DIR>          config
03/16/2010  12:56 AM            33,107 COPYING.txt
09/08/2010  09:50 PM    <DIR>          docs
09/08/2010  09:50 PM    <DIR>          dvwa
03/16/2010  12:56 AM               883 ids_log.php
06/06/2010  07:52 PM             1,878 index.php
03/16/2010  12:56 AM             1,761 instructions.php
08/26/2010  11:18 AM             2,580 login.php
03/16/2010  12:56 AM             2,738 security.php
06/06/2010  10:58 PM             1,350 setup.php
09/08/2010  09:50 PM    <DIR>          vulnerabilities
              16 File(s)         59,772 bytes

 Directory of C:\xampp\htdocs\dvwa\config

09/08/2010  09:50 PM    <DIR>          .
09/08/2010  09:50 PM    <DIR>          ..
08/26/2010  10:32 AM               576 config.inc.php
08/26/2010  11:06 AM               576 config.inc.php~
               2 File(s)          1,152 bytes

 Directory of C:\xampp\htdocs\dvwa\docs

09/08/2010  09:50 PM    <DIR>          .
09/08/2010  09:50 PM    <DIR>          ..
08/26/2010  10:32 AM           526,043 DVWA-Documentation.pdf
               1 File(s)        526,043 bytes

The parser is also capable of parsing directory listing files from various linux commands such as ‘ls -lR’ and ‘ls –R’. Examples of the format are as follows:

ls -lR:
.:
total 124
-rw-rw-r--  1 user user  2792 Aug 26  2010 about.php
-rw-rw-r--  1 user user  5066 Jun  6  2010 CHANGELOG.txt
drwxrwxr-x  2 user user  4096 Jul  1 16:52 config
-rw-rw-r--  1 user user 33107 Mar 16  2010 COPYING.txt
drwxrwxr-x  2 user user  4096 Jul  1 16:52 docs
drwxrwxr-x  6 user user  4096 Jul  1 16:52 dvwa
-rw-rw-r--  1 user user   883 Mar 16  2010 ids_log.php
-rw-rw-r--  1 user user  1878 Jun  6  2010 index.php
-rw-rw-r--  1 user user  1761 Mar 16  2010 instructions.php
-rw-rw-r--  1 user user  2580 Aug 26  2010 login.php
-rw-rw-r--  1 user user   413 Mar 16  2010 logout.php
-rw-rw-r--  1 user user  2738 Mar 16  2010 security.php
-rw-rw-r--  1 user user  1350 Jun  6  2010 setup.php
drwxrwxr-x 11 user user  4096 Jul  1 16:52 vulnerabilities

./config:
total 8
-rw-rw-r-- 1 user user 576 Aug 26  2010 config.inc.php
-rw-rw-r-- 1 user user 576 Aug 26  2010 config.inc.php~

./docs:
total 516
-rw-rw-r-- 1 user user 526043 Aug 26  2010 DVWA-Documentation.pdf

./dvwa:
total 16
drwxrwxr-x 2 user user 4096 Jul  1 16:52 css
drwxrwxr-x 2 user user 4096 Jul  1 16:52 images
drwxrwxr-x 3 user user 4096 Jul  1 16:52 includes
drwxrwxr-x 2 user user 4096 Jul  1 16:52 js
ls -R:
.:
about.php
CHANGELOG.txt
config
COPYING.txt
docs
dvwa
external
favicon.ico
README.txt
robots.txt
security.php
setup.php
vulnerabilities

./config:
config.inc.php
config.inc.php~

./docs:
DVWA-Documentation.pdf

./dvwa:
css
images
includes
js

Now that we have a directory listing for our application, let’s parse out all of the directories and files and create valid URLs. Click the “Generate URL List” button to start the parsing. Tip: If the generated URLs don’t look correct you can modify the fields on the left of the GUI and regenerate the list or copy the list and use your own text editor to make changes. (Please e-mail SmeegeSec@gmail.com with any parsing issues or suggestions)

A text area is populated with the URLs and the total count of directories and files processed.

At this point we have a few options. We can take our list of URLs and use them in Burp’s Intruder. To do this it would be very easy, all that needs to be done is remove the protocol, hostname, and port from each URL within a text editor. From there we take the path of each resource as a payload in a GET request in Intruder. We could then look to see which resources we are able to reach by analyzing status codes and content length. A second option is built into the extension via the “Import URL List to Burp Site Map” button. This button makes a request to each URL in the list (with cookie information, if it was found) and if a valid response is returned, will add the request and response to Burp’s Site Map. Requests with keywords such as logout, logoff, etc. are skipped to avoid ending sessions. The import to site map functionality was one of the main features I wanted to implement.

Warning: Actual requests are being made. Remove any resources you don't want being made, such as delete_database.php!! Regex to remove resources will be added in updates.

Done! A message dialog tells the user how many URLs were valid and imported into the site map. In the above image you can see a full site map and proxy history which was not found by spidering or brute forcing directories/files, but rather a simple directory and file listing of the application. With a full site map we are now ahead of the game. If you have multiple testers testing an application you can save the state in Burp and distribute it to save time, almost completely bypassing the discovery phase.

Note: So far the parsing does not consider virtual directories or different URL mappings from different web frameworks. Future updates may include parsing of mapping files such as ASP.NET’s web.config and Java’s web.xml.

Tip: Running a plugin multiple times or multiple plugins at a time may require increased PermGen, an example to increase the max when launching Burp would be:

java -XX:MaxPermSize=1G -jar burp.jar

Also, please provide feedback if you use this extension. With many different output formats for directory and file listings it can be difficult to write a dynamic parser which works for every format. If you have a listing file which is not being properly parsed please contact me so I can include it in an update. Thanks!

Click Here to Download Source Code

Sunday, May 12, 2013

Using Client SSL Certificates with Burp Suite

As of version 1.5.09 released on Tuesday, March 26 2013, Burp has integrated support for PKCS#11 and 12 client SSL certificates from files, smart cards, and other physical tokens.

Key features include:
  • Ability to configure multiple PKCS#11 and PKCS#12 certificates for use with different hosts (or host wildcard masks).
  • Auto-detection of installed PKCS#11 libraries (currently Windows only).
  • Auto-detection of card slot settings.
  • Support for OS X, Linux and 32-bit Windows (note that Oracle Java does not currently support PKCS#11 on 64-bit Windows).
  • Persistence of configuration across reloads of Burp.

I'll be quickly showing how to use a hard token with Burp Suite on a Windows virtual machine. The process would be very similar on different operating systems or with certificate files.

First, insert your hard token and make sure it's recognized. Because I am using a Windows virtual machine it's recognized as a Rainbow USB Device


In Burp, select the 'Options' tab and scroll down to the 'Client SSL Certificates' section and select 'Add'.

Select the certificate type, either File (PKCS#12) or Hardware token/Smart card (PKCS#11). Also you can specify a specific destination host or leave that part blank to apply to all hosts.

Specify the location of the library file for the hardware token. Burp allows you to manually select this file or it will attempt to automatically locate it. (Windows only)

Select which locations for Burp to search. All found library files will be listed. Select the correct one and click Next. If you're not sure which file to use you can always retry using the different files.

Enter the PIN code and click Refresh. Select the certificate you want to use and click Next.

Success! Check to make sure you have the correct access. Remember, if it doesn't work you may need to try a different library file.

One thing to note, often times various user roles in an application require different tokens. I did have trouble having multiple tokens loaded and quickly switching between them. The fastest way I found was to just add/remove the tokens and certificates one at a time. A slight annoyance when doing role-based testing but not too bad. Overall this is great functionality for Burp Suite to have.

Friday, April 19, 2013

WSDL Wizard: Burp Suite Plugin for Detecting and Discovering WSDL Files


Introduction

WSDL (Web Service Description Language) files often provide a unique and clear insight into web application functionality. They can be made public and accessible by client-side users or private. From an attacker’s point of view public WSDL files make finding vulnerabilities easier, however even if the files are private, any vulnerabilities will still exist. From the perspective of a penetration tester, depending on what kind of test it is, it may or may not be appropriate to ask the client for WSDL files before the test.

So how do we find the WSDL files which are public? What if there are no direct links to find during spidering? The WSDL Wizard plugin! There have been tools in the past such as OWASP’s WSFuzzer which do an average job when they work. I wanted to write a Burp Suite extension in python which would make WSDL file detection and discovery not only easy to use but also efficient and safe in terms of scope.

This plugin searches the current Burp Suite site map of a user defined host for URLs with the ?wsdl extension while also building a list of viable URLs to fuzz for 'hiding' WSDL files. Two different methods are available to check for ?wsdl files, using urllib2 (default) or Burp's API. The fuzzing method depends on which function is called in the code so switching is easy. When comparing efficiency against large site maps, urllib2 was about 30 percent faster. All found WSDL files are added to the existing site map and printed out in the Extender tab output section.

After we have our WSDL files it’s time to make use of them. I did a previous post called Automatic Web Services Communication and Attacks which discusses using tools such as soapUI to inject into SOAP requests.

WSDL Wizard Use

WSDL Wizard runs off all of the requests and responses in Burp’s Site Map of a user selected host. Before running the plugin it is beneficial to have as much information in the site map as possible. This plugin should be used at the end of the information gathering stage when you have near complete coverage of the application.


To run this plugin three things are needed:

In the Extender > Options tab, select the location of your Jython standalone file.

In the Extender > Extensions tab load WSDLWizard.py

Now we are ready to use the extension. A menu option of ‘Scan for WSDL Files’ will appear if the user right clicks in the message viewer, site map table, or proxy history. In the following case I am running the plugin on OWASP’s WebGoat vulnerable application. In the site map there is already a valid request and response for the WSDL file.

The output from the plugin reports on the host which was scanned, the full URL of the detected WSDL file, and how many other viable URLs it fuzzed with the ?wsdl extension. In this case the WSDL file was detected and 29 files were fuzzed but no more found because there is only one in this application.

Using a site map without a WSDL file in it really displays the main feature of this plugin. It will detect /WebGoat/services/WSDLScanning as being a candidate to fuzz with the ?wsdl extension.

After running the plugin the output reports 1 WSDL file was fuzzed and adds that request and response to the current site map.

Now we have all the WSDL files and the real fun begins! I have now shown how to detect WSDL files and even discover new ones you never knew were there.

I hope everyone likes it. This is my first Burp plugin so feedback would be very much appreciated. Any comments, suggestions, or errors please comment on my blog or email me at SmeegeSec@gmail.com